
This recipe for Ciabatta Bread creates a very light loaf, soft and chewy on the inside with a thin crunchy rustic crust. I originally made it for my mom’s birthday in 2006, before she developed a gluten allergy and it was a huge hit. Since that time it has become one of the most popular recipes here on Trinigourmet, even being linked to by The Fresh Loaf!
Although I have been thrilled by all the attention that my little writeup has gotten through the years it has not been without some controversy. Many readers have expressed confusion and problems with my original instructions. That is why I am now republishing it with greater details around those steps which I think were causing some to have less than desirable results.
Before I proceed I must state that for the best results it is very important that you use bread flour instead of all-purpose. You will get a much better crumb due to the higher gluten content.


Now let’s proceed 🙂
Ciabatta Bread Recipe:
Ingredients:
1/8 teaspoon active dry yeast
2 tablespoons warm water
1/3 cup warm water
1 cup bread flour
1/2 teaspoon active dry yeast
2 tablespoons warm water
1 tsp brown sugar
2/3 cup warm water1 tablespoon 2 tablespoons olive oil (edited in light of this comment 🙂 )
2 cups bread flour
1 1/2 teaspoons salt
Wholewheat flour for dusting
Directions:
1. To Make Sponge: In a small bowl stir together 1/8 teaspoon of the yeast and the warm water and let stand 5 minutes, or until creamy.

2. In a bowl stir together yeast mixture, 1/3 cup of the water, and 1 cup of the bread flour.
3. Stir 4 minutes, then cover bowl with plastic wrap. Let sponge stand at cool room temperature for 24 hours.

After 24 hours
STOP! Before you read on, please note that it is very important that you get these first 3 steps correct. The most common question I get is whether I really meant to add 1/3 cup of water to 1 cup of bread flour! Yes, I did 🙂

At first when you add the water you will get something that looks like this…

rather dry isn’t it?
That’s why the instructions say to stir for four minutes. See how it gradually comes together?


The above can only happen with constant folding. You don’t want a soft or liquid sponge at this point. It will soften considerably as it sits overnight. You want it to hold together.
If at the end it is still a little too dry you can add water by the tablespoon, but again just enough to hold it all together.

4. To Make Bread: In a small bowl stir together yeast, warm water and sugar and let stand 5 minutes, or until creamy.
5. In bowl of a standing electric mixer fitted with dough hook blend together yeast mixture, sponge, water, oil, and flour at low speed until flour is just moistened; add salt and mix until smooth and elastic, about 8 minutes. The dough should be relatively firm at this point and clear the sides of the bowl. If it’s not gradually add more flour (by the 1/4 cup) until it forms as described.

6. Scrape dough into an oiled bowl and cover with plastic wrap.

7. Let dough rise at room temperature until doubled in bulk, about 1 1/2 hours. (Dough will be sticky and full of air bubbles.)

They grow up so fast! 🙂
8. Turn dough out onto a well-floured work surface and cut in half.
9. Transfer each half to a greased baking sheet sprinkled with cornmeal and form into an irregular oval about 9 inches long. Dimple loaves with floured fingers and dust tops with wholewheat flour.

10. Cover loaves with a dampened kitchen towel. Let loaves rise at room temperature until almost doubled in bulk, 1 1/2 to 2 hours.

11. At least 45 minutes before baking ciabatta, put a baking stone on oven rack in lowest position in oven and preheat oven to 425 F (220 degrees C).
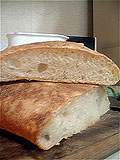
12. Bake ciabatta loaves 15-20 minutes, or until pale golden.
13. Cool loaves on a wire rack.
Makes 2 loaves
This post was originally published on November 24, 2006. It has been updated once since then.

Comments
134 responses to “Ciabatta Bread (recipe)”
The bread looks great. I look forward to trying this – love good crusty bread. Great site by the way, a lot of work and great recipes!
Thanks a lot 😀 This site has become a labour of love for me 🙂 I hope to be adding pelau, black cake and pastelles over the weekend so do come back 😀 Let me know how your ciabatta comes out, it’s so much fun! 🙂
Nikki did you rememebr the Home Ec techniques or are you doing this from wrote because I don’t remember Home Ec preparing ME for all this good stuff!
Child, the only thing i remember from home ec was the ‘well method’ of combining wet and dry ingredients. wait… no… i also remember to only wash things with dough on them with cold water so as not to activate the gluten… but other than that …. #$#%@#!C … everything is out of watching tv cooks and just trial and failure 😀
Sarina,
Beautiful bread! I dont happen to get ‘bread flour’ in Bombay and I stay away from using all purpose flour. We get ‘atta’ which is the wheat flour used to make ‘rotis’ – Indian flatbreads – can I try this recipe with wheat flour?
Sarina,
Beautiful bread! I dont happen to get ‘bread flour’ in Bombay and I stay away from using all purpose flour. We get ‘atta’ which is the wheat flour used to make ‘rotis’ – Indian flatbreads – can I try this recipe with wheat flour?
Hi Nandita, I have no familiarity with atta. We tend to use all purpose flour with roti here… is wheat flour like whole wheat? If so I think it would be heavier, and you may not get an airy loaf… I’ll have to ask around, and I hope that maybe someone who sees this thread can give a definitive answer?
Your recipe looks like a winner! There are two things I could think of to add: 2T of olive oil (most recipes that I have read calling for 1T were disappointed in that the flavor was not quite as prominent); and then spraying the loaf(s) with water at least twice during the cooking period. This makes such a nice crusty loaf. I will be trying your recipe, as my search continues for that PERFECT “airy” loaf, which I have not quite perfected as yet. Here’s one interesting thing I read … adding brown sugar (I believe it was 1T, but cannot remember exactly) ~ that’s interesting. I love salt, so also top my loaves with Kosher salt after the last spraying of water, so as to not dissolve it. Good job, and thanks for the recipe! Glad I found your site, and HAPPY NEW YEAR!
Hi Shalee 😀 So glad you found my little corner of the ‘net 😀 Thanks for those tips. I love the taste of olive oil so I’ll definitely add an extra tablespoon the next time around 🙂 I’ll try spraying the loaf too.. I tried spraying some baguettes once and I think i overdid it LOL … must get a gentler mister I think?
Hope you’ll pass by again, and Happy New Year to you and yours 😀
Nikki
I finally made a loaf of bread! My first ever! Thanks for the inspiration 🙂
glad to inspire! 🙂
Nikki
I finally made a loaf of bread! My first ever! Thanks for the inspiration 🙂
glad to inspire! 🙂
Hey, Love the pics along with the recipe. I am new at the bread baking. Last night was my umpteenth attempt at italian bread and it finally turned out perfect. Decided my yeast was bad for the past attempts. I am going to make your bread right now, well, the sponge anyway. Looks great. Nice job.
Helene FLOUR POWER!
hi helene 😀 i’m glad you finally had success with your breadmaking! Making bread is one of my favorite things and once you get the hang of it the varieties and options are endless! The price of bread has gone up so steadily over here that we now make all our bread at home. Do let me know how it turns out for you 🙂 FLOUR POWER! 😀
This looks great, but I think I’m missing something. Where is the milk mixture part of the recipe?
Hi Karen 🙂 There is no milk part, maybe you are thinking of Ciabatta Latte, that is when ciabatta has milk added. I’ve never made that variation though.
Oh, it was in step 5 so I wondered…
Oh my! Thanks for pointing that out Karen, it should say ‘yeast mixture’ 🙂
I have been buying (so called) “9 grain Ciabatta buns” from Costco in Ontario, Canada. The ingredience showing on the bag are; Flour ,Water, 9 grain mix (of Wheat flakes, Rye Flakes, Sunflower Seeds, Flour, Wheat Bran, Flax Seeds, Sugar, Salt, Corn Flakes, Fye Flour, Oat Flakes, Soya Grits, Millet, Malted Barley flour, Vegetable Oil, Colour, Diacetyl Tartaric Acid Esters of Mono-Digycerides, Ascorbic Acid, L-Cysteine Hydrochlorides, Azodicarbonamide, Amylase) , Bread Mix (flour, Salt, Dry Sourdogh of Rye, Rye Flour, Yeast, Bacterial Culture, Malted Barley Flour, Vegetable Oil, Dextroes, Diacetyl Tartaric Acid Esters of Mono-Diglycerides, Ascorbic Acid, L-Cysteine Hydrochloride, Azodicarbonamide, Amylase) Yeast.
Looks like you need to be a chemist to sort all this out.
My question is does anyone have a multi grain Ciabatta Bread recipe?
We really like these buns. Not as heavy as white bread for sure. Great with hamburgers off the grill or toasted in the morning with your favorite preserve. Anybody heard of this or have tried the Costco buns. Debbie
Instead of “spraying the loaves” try this: preheat the oven 50 degrees hotter than recipe calls for. Place shaped loaves in the oven. Have a spray bottle ready with clean water and on a misting setting. As soon as you put the bread in–mist the SIDES of the oven (stay away from the elements!!!!!) (and lightly on the top of the dough if you want) Quickly close the oven. Repeat about 1 minute later. Then repeat again another minute later. I do this about 4 times and then I TURN THE HEAT DOWN to the temperature called for in the recipe (don’t forget–I’ve burned alot of bread because I’ve forgotten!) The spraying will cause a steam that will make a wonderful crust.
Went OK until I tried to remove the “dampened kitchen towel”. What a mess. I assume I’m not supposed to cook the towel.
Has anyone got a better idea?
Went OK until I tried to remove the “dampened kitchen towel”. What a mess. I assume I’m not supposed to cook the towel.
Has anyone got a better idea?
Ron – was the dough too sticky? try a greased sheet of plastic film 🙂
OK, that seemed to help. I also reduced the water a little to make it less sticky.
ugh I don’t know what I did wrong but my bread came out FLAT! 🙁
Hi Sarina Just found you by accident looking for a Ciabatta Bread recipe. Believe me, I will be back. You’re “bookmarked” now…thanks again and Happy Holidays to you and yours.
The loaves look great! I would recommend flouring the top before baking after a quick brush of olive oil for a more authentic texture, but the crust and crumb look excellent!
Topchef at http://www.epicureforum.com
Your Mise En Place for restaurants, recipes, and everything food!
The loaves look great! I would recommend flouring the top before baking after a quick brush of olive oil for a more authentic texture, but the crust and crumb look excellent!
Topchef at http://www.epicureforum.com
Your Mise En Place for restaurants, recipes, and everything food!
The loaves look great! I would recommend flouring the top before baking after a quick brush of olive oil for a more authentic texture, but the crust and crumb look excellent!
Topchef at http://www.epicureforum.com
Your Mise En Place for restaurants, recipes, and everything food!
My bread tastes wonderful but it has turned out flat both times I have tried it. What could I be doing wrong? Any suggestions? Thanks
Hey Debbie,
Yes!! I love the ciabatta bread from costco. We buy the bag on regular bases.
My only question is about how good is it for you? how many calories is in one bun and fat etc.
anyone know????
Hey Debbie,
Yes!! I love the ciabatta bread from costco. We buy the bag on regular bases.
My only question is about how good is it for you? how many calories is in one bun and fat etc.
anyone know????
Hey Debbie,
Yes!! I love the ciabatta bread from costco. We buy the bag on regular bases.
My only question is about how good is it for you? how many calories is in one bun and fat etc.
anyone know????
Ah thanks I was looking for this and it looks good! but I have to say the comment on Costco’s version has me thing I will go there if I run out of time to bake. Thanks for the post!
I am going to try baking this bread. I don’t know what a baking stone is or how to use one. Is it really necessary?
I too, have had the buns from Costco – they are made by “Kirkland” and are a 9 grain bun. Love them.
I am going to try baking this bread. I don’t know what a baking stone is or how to use one. Is it really necessary?
I too, have had the buns from Costco – they are made by “Kirkland” and are a 9 grain bun. Love them.
I am going to try baking this bread. I don’t know what a baking stone is or how to use one. Is it really necessary?
I too, have had the buns from Costco – they are made by “Kirkland” and are a 9 grain bun. Love them.
When I try to make the starter my mixture gets very dry before I have all the flour mixed in. Is 1/3 cup (plus 2 T) water to 1 cup of flour correct?
Thanks
When I try to make the starter my mixture gets very dry before I have all the flour mixed in. Is 1/3 cup (plus 2 T) water to 1 cup of flour correct?
Thanks
this bread is geat topped with chedder and sliced jalapenos while baking
Paul – I haven’t made it in a while but i never had any problems. I will try it again and see for sure…
just a couple of notes…
to the couple of folks who were distressed that their loaves came out “flat” — well, remember, it’s supposed to. commercial loaves that I can get locally are like 6 inches wide by 15 inches long (a big rectangle), by an inch and a half thick, at most!
“atta” flour is described on web pages I just looked up as durum whole wheat, especially used for chapatis. durum is THE hard wheat, that’s the type with the extra gluten that’s good for bread making. so the durum is good, but the whole-wheat part will make the bread somewhat heavier, but that may be OK, since rise isn’t the big thing with ciabatta. (very odd, Golden Temple website says their Durum Atta flour is LOW gluten!)
THANKS for the answer that mentioned “ciabatta latte” — I was wondering why some of the recipes were turning up with milk! good to know it’s an authentic variation, not something fudged up to make the dough easier to handle… you know, anything that isn’t flour-water-yeast may be somewhat suspect!
speaking of which, is the brown sugar your personal addition?
I’ve done the spray-bottle “steaming” with other recipes; it works but usually produces a thicker, tougher crust than I like, but the light crispy crust of ciabatta is one of the things I like about it, so will try. the spraying around the loaves (on the walls) is definitely the way to go, rather than spraying directly on the loaves.
Great pictures, good to know how wet this dough is SUPPOSED to be.
Wish me luck, I’ll be doing this all by hand (step 5, 8 minutes!); I have a 20-yr-old blender, but no stand mixer or food processor. Being stubborn about it, 8-), prefer to use hand methods. At least while working up a new recipe. (Learned bread by hand, from my grandmother.)
Well, that’s enough shooting of my mouth before I’ve tried the recipe, 😎 I’ll be back with report on results, eventually.
about the costco buns: i work there in the bakery and have made the 9 grain buns. the 9 grain mixture comes in a bag, plus we make hundreds at a time so it’d be hard to say how to replicate it properly 🙁 I was actually looking for my own version of the 9 grain recipe when i came across this recipe.. I’ll have to continue looking i guess!
oct 18 2008 hi sarina. iv’e never made this breadbefore but iv’e bought it and it’s the best. my ? is. when you put a baking stone on the bottom rack of the oven do you also put the baking sheet with bread on the stone or, do you put the sheet with the bread on the upper rack and leave the stone there/ the sponge has been prepared and will be ready by 9am tomorrow, i’m hoping you’ll get back to me by tomorrow afternoon. thanks for your help 🙂
re:deborah oct 18th 2008. iv’e made the bread. it turned out tasty and crunchie on the outside but, it was too soft in the middle. what went wrong ??? i followed the directions accordingly, step by step and i left the stone on the lowest rack of the oven but put the bread on the sheet on the upper rack. i even lightly sprayed the bread to get some steam. the recipe i used was the 24hour one.i’d like to try it again(as they say,(practice makes perfect)and have a chewy inside,please help!! thanks again
Hi. Has anyone figured the calorie content for a serving? I buy the buns from Costco but they don’t list the calories. I think I’ll try this recipe when I get the time. Thanks!
can you use a baking sheet if you dont have a stone?
I had the same problem as Paul, when I made the starter, it was dry and to thick to stir. All the other starter recipes I have found have a higher liquid to flour ratio. Mine didn’t resemble the photo at all, and the bread came out flat and dense. Is 1/3 cup water(+2 TBS) enough for 1 cup of water?
I think the starter needs more water. Another recipe I have used requires flour and water in a 5 to 3 ratio (2 1/2 cups flour to 1 1/2 cups water). The starter should look like a thick pancake batter and less like a bread dough.
This is another version, very close to mine.
http://theyumblog.wordpress.com/2008/11/18/peter-reinharts-poolish-ciabatta/
It also incorporates a folding type of kneading for this wet dough.
[img]http://i266.photobucket.com/albums/ii263/douG556/P1020581.jpg[/img]
Thanks Doug… as a lot of you have made the same comment I think the above is definitely a typo. I have not had a chance to revisit the recipe but when I do I’ll make the necessary changes. Best Wishes .
Hi there!
Wonderful site.. beautiful recipes! 🙂
Q: I was wondering if i could use this recipe, but conform it to my bread maker? I’m not much of a ‘gadget’ girl.. but since receiving a maker as a gift, i love to use it for the ‘dough’ setting.
I assume that i would place the ingredients in a typical bread maker ‘order’.. ?
Kind regards,
-Judi
Great recipe!! I didn’t take the time to read far enough down to see if someone else got to the whole wheat question…it’s very heavy. I made the starter with bread flour and the dough with whole wheat. It’s not too bad, it more has the texture of focaccia than ciabatta. I’m working on a recipe, if I come up with something, I’ll post it here!
hi
thank you for your reciepe
but i just wonder what type of flour your suggest to used for ciabata i know diffent bread used different flour could you tell me some type of flour used for bread and cake
thank you
hi
thank you for your reciepe
but i just wonder what type of flour your suggest to used for ciabata i know diffent bread used different flour could you tell me some type of flour used for bread and cake
thank you
Awesome recipe! Best bread I’ve made to date. After some testing on my side, I was unable to detect any difference between loaves baked by following step one and just skipping step one altogether. Is there any particular reason for step one?
Thank you for the preparation you put in to this file. You make things very clear.
At the age of 68, I am learning to bake. I have been experimenting with Ciabatta for around a month now. My method is virtually your recipe. I measure, and time carefully. My loaves appear out of the oven similar to the loaf you show cut in half. And I am happy with the slightly sourdough aromas, and the flavours I’m getting.
Local artisan bakers however, produce Ciabatta that looks similar on the outside, but is much lighter, and more full of gassy holes.
Question. Why don’t my loaves come out light and full of holes ?
What am I doing wrong ?
Can you offer some suggestions ?
John
Yikes – cornmeal?? Two things I would suggest. In order to get a light and airy bread the first rising the dough should TRIPLE in size (that’s the secret). For the second rising you would sprinkle flour (not cornmeal) on baking or parchment paper and stretch the dough out on top of the flour and let it rise. When ready to bake, carefully flip the loaves over onto preheated baking sheets (or your baking store) and bake longer in a cooler oven (400 degrees for 25-30 minutes).
I have been looking for a bread recipe for the garlic butter bread I bought at Costco 3 or 4 years ago. It was only 1 1/2 inches high, sliced down the middle and both insides had butter with chunks of garlic in it. I no longer live close to a Costco and was wondering if anyone knew if the bread they used was the ciabatta bread. This recipe looks wonderful and I will try it. Thank you
For calorie/ nutrient counts, check http://www.calorieking.com.
It breaks down like this:
Yeast= 12 calories per teaspoon. This recipe has a total of 5/8 tsp, so that gives 7.5 calories and 0.13gm fat.
Flour= 455 calories per cup. This recipe has a total of 3 cups (not including dusting flour), so that gives 1365 calories and 3.9 gm fat.
Brown sugar= 17 calories per packed tsp. This recipe has 1 tsp, so that’s 17 calories and 0 gm fat.
Olive oil= 39 calories per tsp. This recipe has 6 tsp, so that’s 234 calories and 27g fat.
Now, add them all together for 1623.5 calories and 31.03gm fat for the entire loaf. (That’s more than a days calories for a small moderatively active woman).
Of course you wouldn’t eat the WHOLE loaf in one sitting, or would you? Divide the total by the number of servings you cut from it. If you make 2 sandwiches from each loaf, that would be 405.75 calories per sandwich not including whatever you put on top. Happy eating.
Great recipe…Actually, I never made it as the exact recipe…I did a whole wheat version (had to modify amounts a little bit) and it turned out great. I don’t think it was quite as high as the pictures looked but it had lots of holes in it when I cut it open after I baked it. And, my Mom was the critic I had to win over as she LOVES Costco ciabatta bread….needless to say MISSION ACCOMPLISHED!!! Thanks for a good “base” from which to start…
Can’t wait to give this recipe a try — looks wonderful.
I have a problem though. I have gotten into home pizza making but am looking for a tougher/chewier crust and I am thinking that the ciabatta might be what I’m looking for. Anybody have experience or ideas/suggestions in this endeavor?
Can’t wait to give this recipe a try — looks wonderful.
I have a problem though. I have gotten into home pizza making but am looking for a tougher/chewier crust and I am thinking that the ciabatta might be what I’m looking for. Anybody have experience or ideas/suggestions in this endeavor?
Hi,
I started learning baking a month ago. I am wondering if I don’t have electric mixer and I stir it, would it possible to make ciabatta?
Hi,
I started learning baking a month ago. I am wondering if I don’t have electric mixer and I stir it, would it possible to make ciabatta?
Hi Callie,
I don’t have a mixer either and have done all my experimental batches by hand. The last one was the first time with this recipe where I really noticed where Step 3. says “stir 4 minutes”. I couldn’t believe how it liquified, AND how hard it was to stir! I used one of my kitchen timers so I could stop and start to rest my hands and still keep track of “4 minutes”. It was a HUGE job but it worked. But if I could do it, it CAN be done. (I’m 61 and have carpal wrists!) Definitely use a wooden spoon or something with a handle that you’ll be able to use for the whole time without killing your hand.
I’ve been looking specifically for recipes that “do it by hand”, since of course these Italian country breads were done for millennia without modern appliances. The “by hand” recipes are out there. I haven’t gotten to many of them, as I’m the only bread-eater here, and trying to lose weight.
I have a local model to work toward, so that’s something (one of the local organic groceries has a house ciabbatta that is JUST what I’m trying to get to). It’s the chewy factor for me, not so much shards-of-glass-in-the-mouth crispy crusts.
hi callie
chimene is right. you can do any of the recipes that calls for electric mixers by just using a spoon until you cant stir it any more then you tip it onto a floured bench and knead it until when you press it with your finger lightly, it springs back into shape.
hi callie
chimene is right. you can do any of the recipes that calls for electric mixers by just using a spoon until you cant stir it any more then you tip it onto a floured bench and knead it until when you press it with your finger lightly, it springs back into shape.
I am really having trouble with the water to flour ratio. I see it mentioned by a couple of other comentaters. I would like someone who weighs instead of measures show what they are using. I use 5 ounces of flour to 4 ounces of water on the sponge to get it liquid enough. (About an %80 ratio.) Does anyone else use weights. I would appreciate comments.
This came out delicious, thanks!
As to the people having trouble with the ratios of water to flour etc., I add more water if it’s too thick or more flour if it’s too runny. In my experience, cooking comes out a lot better (and less stressful) with improvisation.
I’ve made a couple of batches and the longer I left mine, the more (and larger) the holes were, and the airier the loaves. Which seems only logical as it gives the bacteria more time to reproduce and respire.
Good luck to all the new bakers out there!
S
After 24 hours, my sponge is not v big or wet. It only started growing after I put it in the microwave (not turned on) bc it wasn't growing in my air-conditioned kitchen. Can I wait another 24 hours or do it later tonight?
if you have the time tonight do it tonight, otherwise an additional 24 hour wait should not be detrimental. The sourdough flavour will just be more pronounced. Thanks for mentioning that your kitchen is air-conditioned. I forget sometimes that not everyone’s kitchen is at tropical levels. Very important for the sponge to be in slightly warmer setting 🙂 !
One might get superior taste and texture, and health effect, by using 100% stone-ground whole wheat, with some stone-ground whole rye – and, if you like, fine-crushed hickory nuts or pecans, whatever.
Preferably all organic if available; no additives, no preservatives, and definitely no ‘white flour added’ – while using correct (slow) milling rates to keep milling temperature under 43ºC. One link:
http://www.soilandhealth.org/06clipfile/Nutritional%20charateristics%20of%20organic%20freshly%20stone%20-%20ground.htm
hi Christina, the dough is really fragile so in the beginning i put the baking sheet on the stone. I have since been practicing placing it on parchment and sliding the parchment onto the stone. I think a baker’s peel could be very helpful in this instance as well
do i just place the entire baking sheet onto the stone or do i try to remove the loaves and place them onto the stone in order to cook them?
hi Christina, the dough is really fragile so in the beginning i put the baking sheet on the stone. I have since been practicing placing it on parchment and sliding the parchment onto the stone. I think a baker’s peel could be very helpful in this instance as well
Hi,
I've had the best ciabatta bread from this great bakery but have to travel far to get it. It looks very similar to the pics above; so have decided to make my own.
I've made this bread twice now and it always comes out of the oven as dense without the lovely airy bubbles. What am I doing wrong? I'm new at this so I'm sure there's a whole lot that I'm doing wrong. I appreciate advice anyone can give me. Thanks, Cathie.
I'm, so far, able to get the ratio of 100% whole wheat bread flour up to about 40% and still maintain the big air spaces that are so typical of this type of bread. Go much above that and you will most likely cut the amount of gluten to the point where it can no longer hold the air spaces. Whole wheat flour is very dense, so one must spend time developing the gluten and allowing it to rise adequately or your loaves will be flat and heavy. It is worth the effort, however, if you can do it. It adds a layer of nutty flavor that unbleached white bread flour, alone, cannot give it. Good luck.
Place some corn meal or some semolina flour on a sheet of parchment, then put the somewhat sticky dough on that and shape it. When it comes time to place the risen dough on the stone use something flat like a pizza peel (I just let mine rise on the peel) and just slide the parchment, with the dough one, it very gently off onto the stone. When baked, retrieve it back off the stone, onto the peel, in reverse fashion.