The Cuisine of Trinidad & Tobago, The Caribbean & Beyond!
July 6, 2010
Trinidad Pholourie: The Only Recipe You’ll Ever Need
July 5, 2010: Sometime between when this post was originally written in 2007 and now it appears Saveur Magazine selected this recipe as one of its ‘Best Of The Web‘ (archived here), and Trinigourmet.com as one of its ‘Sites We Love’. I can’t explain how much this means to me as it has always been my hope and aim to disseminate Trinidadian cuisine to the wider world. It really makes the long hours cooking, writing, photographing and editing, not to mention the ongoing expenses, worth it. Thanks so much! 🙂
Yum Yum Yum. I love Trinidad street food. And I love love love pholourie. Pholourie are basically little balls of split pea flour fried and served in a thin sweet chutney sauce (usually mango or tamarind). You can buy them in little paper bags with the sauce in a little plastic bag included. So yum. When I was working in Port of Spain I would often buy a pack of pholourie and a doubles for my breakfast. So the yum!
Pholourie is not restricted to roadside vendors though, I’ve also eaten it as hors d’oeuvres at weddings and other events.
This was my first attempt at making pholourie at home and I was really surprised at how easy it came together. I wanted to have to a nice shot of the pholouries as they were draining, fresh out of the oil but my parents kept hovering and eating them still hot, so I never did get that shot. I suppose that’s a good sign for a cook tho? 😆 Also surprising, was finding out that this was my mother’s first taste of Pholourie. “MMM! So -this- is Pholourie!” she cried. I was shocked!
“C’mon momz, you’ve been living in Trinidad for over 30 years now!”
“True”, she said, adding that she didn’t eat street food though. I think she ate more of them than anyone
“They’re really moreish, aren’t they?”
“Yes mom, they’re totally ‘moreish’.
She’s never had doubles either. Well that will also change by the end of this week 😉
Understanding Split Pea Flour: The Heart of Authentic Pholourie
Before we dive into the how-to, let’s talk about the star ingredient. Split pea powder (also called split pea flour) is what gives pholourie that distinctive flavour and texture. It’s different from chickpea flour or regular flour.
Where to find it: ∙ West Indian or Caribbean grocery stores ∙ Online retailers (Amazon, specialty spice shops) ∙ Some international sections of larger supermarkets ∙ Indian grocery stores (look for “chana dal flour” as an alternative)
The texture should be fine and powdery, similar to regular flour. If you can only find whole split peas, you can grind them yourself in a high-powered blender or spice grinder, but honestly, buying it pre-ground saves time and gives more consistent results.
Essential Kitchen Tools for Perfect Pholourie
You don’t need fancy equipment, but having the right tools makes the process smoother: ∙ Heavy-bottomed pot or deep fryer (for even heat distribution) ∙ Mixing bowl (medium to large) ∙ Two teaspoons (one for scooping, one for pushing batter off) ∙ Slotted spoon or spider strainer (for removing pholourie from oil) ∙ Paper towels or cooling rack (for draining) ∙ Thermometer (optional but helpful for oil temperature)
How to Make Trinidad Pholourie: Step-by-Step Instructions
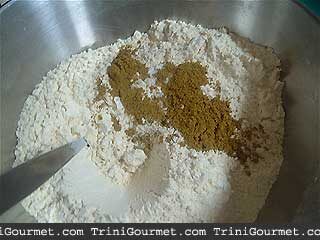
Step 1: Mix Your Dry Ingredients
Start by combining all your dry ingredients in a medium bowl:
∙ 2 cups split pea powder ∙ 1/2 cup plain flour ∙ 1 clove garlic, finely minced or pureed ∙ 1 and 1/2 teaspoons salt ∙ Black pepper to taste (I use about 1/4 teaspoon) ∙ 1 teaspoon saffron powder or 2 teaspoons curry powder ∙ 2 teaspoons baking powder
Pro tip: Use your fingers or a whisk to really break up any lumps. The garlic should be distributed evenly throughout. If you’re using fresh garlic (which I recommend), make sure it’s minced extremely fine or pureed, so you don’t get chunks in your batter.
Why this matters: Mixing the dry ingredients first ensures even distribution of leavening and spices. You don’t want to bite into a pholourie with all the curry powder in one spot!
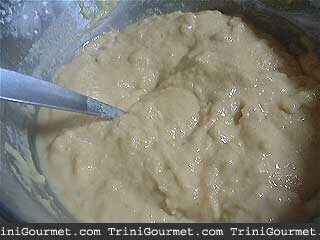
Step 2: Add Water to Create the Perfect Batter
Now comes the intuitive part. Add water gradually, stirring constantly, until you achieve a thick batter consistency.
What “thick batter” means: ∙ It should coat the back of a spoon ∙ When you lift the spoon, the batter should drop slowly (not run off) ∙ Think: slightly thicker than pancake batter ∙ You’ll probably use about 3/4 to 1 cup of water, but add it slowly
I usually start with half a cup and then add tablespoons at a time. Every batch of split pea flour absorbs water slightly differently, so trust your eyes more than exact measurements here.
Common mistake to avoid: Adding too much water. It’s easier to thin a thick batter than to thicken a thin one. If you do add too much water, you can stir in a bit more split pea flour, but your ratios will be off.
Step 3: Let the Batter Rest (This Is Crucial!)
Cover your bowl with a tea towel and let it rest for 1 hour at room temperature.
Why the rest matters: ∙ The split pea flour needs time to fully hydrate ∙ The baking powder starts to activate ∙ The flavours meld together ∙ The batter develops better structure for frying
I know an hour feels long when you’re excited to cook, but this is the step that separates okay pholourie from phenomenal pholourie. Use this time to make your chutney sauce, tidy the kitchen, or just relax
Step 4: Prepare Your Frying Station
Before you heat your oil, set up everything you’ll need:
∙ Pot filled with oil about 7-10 cm (3-4 inches) deep ∙ Plate lined with paper towels for draining ∙ Your two teaspoons ready ∙ Spider strainer or slotted spoon within reach ∙ The bowl of rested batter ∙ Thermometer if using one
Oil choice: I use vegetable oil or canola oil. You want a neutral-flavoured oil with a high smoke point. Avoid olive oil for this.
Step 5: Heat Your Oil to the Right Temperature
Place your heavy pot over medium-high heat. The oil needs to reach 175-180°C (350-375°F).
Testing without a thermometer: ∙ Drop a tiny bit of batter into the oil ∙ If it sinks and slowly rises while sizzling, the oil is ready ∙ If it browns immediately, the oil is too hot (reduce heat) ∙ If it just sits on the bottom, the oil isn’t hot enough (wait longer)
This step takes about 8-10 minutes. Don’t rush it. Oil that’s too cool makes greasy, dense pholourie. Oil that’s too hot burns the outside while leaving the inside raw.
Step 6: Fry Your Pholourie in Small Batches
Here’s the technique that makes all the difference:
Use one teaspoon to scoop up batter
Use the second teaspoon to push the batter off into the hot oil
Work quickly but don’t overcrowd (I do about 6-8 at a time)
They’ll sink briefly, then float and start puffing up
Fry for 3-4 minutes, turning occasionally, until golden brown all over
Remove with your spider strainer and drain on paper towels What you’re looking for: ∙ Golden brown colour (not pale, not dark) ∙ Puffed up to about double their original size ∙ Crispy exterior ∙ Light and fluffy interior
Troubleshooting:
∙ Too dark, raw inside: Oil too hot, reduce heat ∙ Pale and greasy: Oil too cool, increase heat ∙ Not puffing up: Batter too thick, or baking powder is old ∙ Falling apart: Batter too thin, add a bit more flour
Step 7: Keep Them Warm While You Finish Frying
If you’re frying multiple batches (which you will be), keep the finished pholourie warm in a low oven (around 95°C/200°F) on a baking sheet. Don’t cover them or they’ll get soggy. You want to maintain that crispy exterior. Between batches, check your oil temperature and adjust as needed. The oil cools down each time you add batter, so you might need to wait 30-60 seconds between batches for it to come back up to temperature.
Step 8: Make the Killer Chutney Sauce
While your last batch fries, whip up this dead-simple sauce. I made a killer sauce by combining equal parts mango chutney and water and pureeing them with 1 clove of garlic. This is the consistency of pholourie sauce that one usually gets when purchasing locally on the roadside.
The ratio: ∙ 1/2 cup mango chutney ∙ 1/2 cup water ∙ 1 clove fresh garlic
Blend until completely smooth. The sauce should be thin enough to drizzle easily but thick enough to coat the pholourie. If it’s too thick, add water a tablespoon at a time. Too thin? Add more chutney.
Alternative sauces: ∙ Tamarind sauce (more tart, less sweet) ∙ Tamarind-date sauce (balanced sweet and sour) ∙ Mango-pepper sauce (add a bit of hot pepper to the mango chutney mix)
The beauty of this sauce is its versatility. Make a big batch and keep it in the fridge for up to two weeks.
∙ 1 teaspoon saffron powder OR 2 teaspoons curry powder
∙ 2 teaspoons baking powder
∙ 3/4 to 1 cup wateradd gradually
∙ Vegetable oil for deep frying
For The Sauce
∙ 1/2 cup mango chutney
∙ 1/2 cup water
∙ 1 clove garlic
Method
For Pholourie
Mix split pea powder with all dry ingredients (flour, garlic, salt, pepper, saffron/curry powder, baking powder)
Add enough water gradually to make a thick batter (should coat a spoon and drop slowly)
Cover and let rest for 1 hour at room temperature
Heat oil in heavy pot to 175-180°C (350-375°F), about 7-10 cm deep
Drop batter, a teaspoon at a time, into the hot oil (don’t overcrowd)
Fry for 3-4 minutes, turning occasionally, until puffed and golden brown
Remove with slotted spoon and drain on paper towels
For Sauce:
Blend mango chutney, water, and garlic until smooth
Serve warm with sauce for dipping
Serving Your Trinidad Pholourie Like a Pro
Traditional street style: ∙ Small brown paper bag ∙ Sauce in a separate small plastic container or bag ∙ Eat with your fingers, dipping as you go ∙ Best enjoyed standing on a street corner (kidding, but not really)
Party presentation: ∙ Arrange on a platter with the sauce in the centre ∙ Provide toothpicks or small skewers ∙ Serve warm (not hot, not room temperature) ∙ Garnish the platter with fresh coriander
Portion guide: ∙ Appetiser: 3-4 pieces per person ∙ Snack/breakfast: 6-8 pieces per person ∙ Party: Make double what you think you need (they disappear fast)
Why This Trinidad Pholourie Recipe Works Every Time
Let me be honest: I was nervous the first time I made these. What if they fell apart? What if they were greasy? What if my mother, who’d lived in Trinidad for over 30 years without tasting pholourie, finally tried them and they were…disappointing?
But here’s what I’ve learned after making this recipe dozens of times: pholourie wants to succeed. The recipe is forgiving. The technique is straightforward. And even if your first batch isn’t perfect, it’ll still be delicious.
The keys to success: ∙ Rest the batter (don’t skip this!) ∙ Get your oil temperature right ∙ Don’t overcrowd the pot ∙ Trust the process
Common Questions About Making Pholourie
Can I make the batter ahead of time? Yes! The batter actually improves with a longer rest. You can make it up to 4 hours ahead. Just give it a stir before frying.
What if I can’t find split pea flour? You can substitute chickpea flour (besan) in a pinch, though the flavour will be slightly different. Or grind yellow split peas yourself in a high-powered blender.
Can I bake these instead of fry? I haven’t tested this successfully. Pholourie really needs that hot oil to puff up and create the crispy exterior. Baking gives you more of a dense fritter than the light, airy texture you’re after.
How do I store leftover pholourie? Store in an airtight container in the fridge for up to 3 days. Reheat in a 180°C (350°F) oven for 5-7 minutes to crisp them back up. Don’t microwave or they’ll be soggy.
Can I freeze them? Absolutely! Freeze in a single layer on a baking sheet, then transfer to a freezer bag. They’ll keep for up to 3 months. Reheat from frozen in the oven.
My batter is too thick/thin. Now what? Too thick: Add water one tablespoon at a time. Too thin: Add split pea flour one tablespoon at a time. Mix well after each addition.
The Story Behind Every Batch
Every time I make pholourie, I think about those weekday mornings in Port of Spain. The way the vendors would scoop them into paper bags with practised efficiency. The warmth of the bag in your hands. That first bite with the sweet chutney cutting through the savoury, slightly spicy fritter.
Food is memory. Food is culture. Food is connection.
This Trinidad pholourie recipe isn’t just about following steps. It’s about bringing a piece of Trinidad’s vibrant street food culture into your kitchen, wherever you are in the world.
It’s about creating those “MMM! So this is Pholourie!” moments for the people you love. And here’s the beautiful thing: once you’ve made these, you’ll realise you’ve been invited into a tradition. You’re part of the story now.
Join The Golden Swizzle Community
If this Trinidad pholourie recipe resonated with you, imagine what else we could explore together. The Golden Swizzle is my free newsletter where I share the stories behind the dishes, the techniques that transform simple ingredients into unforgettable experiences, and the cultural connections that make food meaningful.
This isn’t just another recipe newsletter. It’s a space for those who believe food is storytelling, culture, memory, and connection. Whether you’re an epicurean home cook or a curious traveller through global flavours, I invite you to swirl your senses a little deeper with me.
Each edition blends personal reflections, treasured recipes, and insider tips to help you master authentic flavours from my kitchen to yours, no matter where in the world you are.
Join The Golden Swizzle below and receive your golden invitation to savour, explore, and connect through the art of slow, meaningful cooking.
Spelling variations: Phoulorie, Pholourhie
This entry was originally published January 30, 2007. It has been updated once since then